Is orbital welding right for your business or application? Keep reading to find out.
In this guide, you will learn the orbital welding essentials. From applications and industries to weld preparations and programming, SEC Automation will share all you need to know about orbital welding.
What is Orbital Welding
Orbital welding is the automatic or mechanized welding of tubes or pipe in-place with an electrode rotating (or orbiting) 360 degrees around the workpiece. Orbital welding can be conducted on tube or pipe with the addition of filler material or as a fusion process.
In the 1950s, orbital welding was developed by the aerospace industry to replace compression fittings and manual welds. This type of welding falls under TIG (Tungsten Inert Gas) welding. As you can see in the graphic below, TIG constitutes for only 3% of welding worldwide. Then, only about 5% of TIG welding is comprised of orbital TIG welding.

Though orbital welding represents only a small percentage of applications, its creation has been vital to the ever-growing standards and success of many industries.
Benefits of Orbital Welding
Manual welding can be unreliable, and workloads can often become greater than even the most skilled welders can handle. With an orbital welding system, uniform welds can be created quickly with a minimized risk of human error.
The orbital welding process is designed to produce welds that meet ASME BPE acceptance criteria. Consistent bead size and full penetration create smooth surfaces that prevent microbiological growth and possible contamination of the product. This is especially beneficial in critical applications such as in the pharmaceutical or food & beverage industries.
Orbital Welding Benefits:
- Increased Speed and Process Efficiency
- Weld Quality – Accuracy and Consistency
- Weld Repeatability
- Weld Cleanliness
- Versatility for Unique Applications (piece unable to be rotated, has poor visibility, or is in a hard to reach place)
- Weld Documentation and History
Orbital Welding Prevents:
- Poor Penetration
- Lack of Fusion
- Poor Purging Techniques
Orbital Welding Applications and Industries
Applications
- Sanitary Tubing
- Tube to Tube
- Tube to Fitting
- Fitting to Fitting
- Pipe
- Pipe to Pipe
- Pipe to Fitting
- Exotic Alloy Application
- Tube to Tube Sheet
- Overlay Applications
Industries
- Semiconductor
- Biotechnology
- Pharmaceutical
- Cosmetic
- Food & Dairy Processing
- Breweries & Wineries
- Electronics
- Chemical
- Aerospace
- Nuclear Piping
Orbital Welding Equipment
An orbital welding system is composed of several pieces: the power supply, the water cooler, the weld head, and the optional (but quite useful) remote pendant.
Power Supply
The power supply, also known as a power source or controller, is where weld programming is conducted. It communicates weld speed, amperage, purging time and more to the weld head. The power supply also documents welds, stores programs for future use and features a printer for documentation purposes after each weld.
Water Cooler
The water cooler is an important component to the orbital welding system. It interconnects to the weld head and holds cooling fluid. We recommend a low conductivity coolant/antifreeze jug of glycol. Utilizing a pump, the water cooler flows the coolant through the weld head coolant lines and into the weld head. This allows the weld head to run at 100% duty cycle and not to overheat the inner components of the weld head during the weld.
Remote Pendant
The remote pendant is a useful and powerful accessory to any modern orbital welding system. It allows the operator to change parameters like weld speed and amperage in real time while away from the power supply and water cooler, useful when performing welds in cramped or hard to reach places.
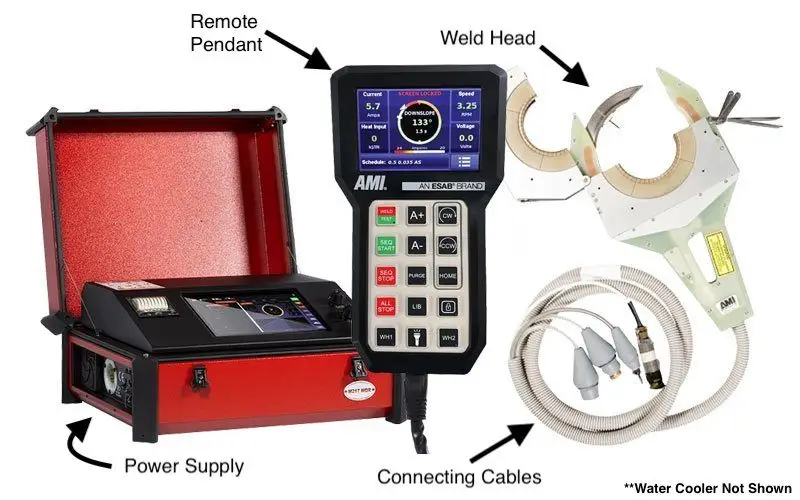
Orbital Weld Head
Weld heads connect to the power supply and water cooler through a series of cable connections. There are two options when it comes to weld heads: enclosed heads and open weld heads.
Enclosed Weld Heads
Enclosed weld heads are often referred to as closed or fusion weld heads. They are closed, as the name suggests, creating an inert atmosphere chamber that surrounds the weld joint. This encapsulated environment helps to create fusion welds with a decreased risk for blemishes or other imperfections.
No welding helmet is needed while conducting a weld. Internally, the weld head rotor holds the tungsten electrode in place as it orbits around the tube or pipe, creating a fusion weld. This type of weld head is typically used for orbital tube welding but can be used on thin-walled pipe.
Suggested Size Limits of Autogenous Welding Enclosed Weld Heads:
- Diameters up to 6″ pipe (6.625″) (schedule 5 pipe) – limited by fixed tungsten length
- Wall thickness up to 0.154″ (2″ schedule 40 possible)
Open Weld Heads
These weld heads are most often utilized for pipe welding applications where filler wire is required, and multiple passes are required to complete the weld. There are two styles of weld head offered in the open face design for pipe welding. The clamping style head uses a vise clamping system to mount to the workpiece. The low profile or guide ring style uses a tracking system that mounts to the workpiece and attaches to the track.
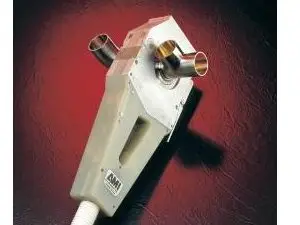
Enclosed Weld Head
Open Weld Head
Orbital Welding Accessories
The most necessary accessory in orbital welding is a consumable – ceriated tungsten. Tungsten is needed to start an arc for the weld. The size and length depend on your application – OD sizes and wall thickness are a few of the factors to consider.
The number of welds per piece of tungsten depends on the quality of the tungsten as well as the material and OD of the workpiece.
Other essential orbital welding supplies include:
- Cleaning Supplies
- Inert Gas & Dual Regulator
- Weld Head Bench Mount
- Oxygen Analyzer
- Printer Paper
How to Orbital Weld
Before you start an arc, there are several important steps to make sure the piece is ready for the weld.
Step 1. Cutting
Before aligning tube or pipe ends, they first need to be cut. Orbital saws rotate evenly around the piece, creating a clean and even cut. This is commonly used on sanitary tubing and small thin-walled pipe.
For larger applications, use a clamshell to cut (and even bevel) through large pipe. A sturdy blade will part even the toughest pipe to get it ready for welds.
If you do not have a clamshell, a band saw can be used.
Step 2. Facing or Beveling
Tube and thin-walled pipe: After cutting, use a tube facing tool to get rid of burrs and other imperfections. Though it is often overlooked, creating a perfect alignment is an important part of creating a good weld, in both orbital and hand welding. Burrs in welds can create a space for bacteria to build and contaminate in the future.
Pipe: Use a portable pipe beveling tool before orbital pipe welding. A bevel is needed to create full penetration on heavy walled pipe. Though there are several types of bevels, a “J-prep” is one of the most common for this type of automated welding. Filler wire is later added during the weld to make up for the missing material.
Step 3. Programming
Today’s power supplies feature auto-programming technology. It is as simple as telling the power supply the weld head being used, material being welded, OD size, and wall thickness. The power supply will generate a pre-developed program and often very little adjustment will need to be made to get an adequate weld program. Otherwise, the operator will need to program the following to develop a program:
- 4 or more welding levels (must include enough time for tie-in before the downslope)
- Control welding speed
- Adjust amperage to get uniform fully penetrated welds
To fully understand programming needs, schedule orbital welding training. You will get in-depth details and hands-on experience while learning from an orbital welding expert.
Step 4. Purging
After aligning, purge oxygen from the inside of the tube or pipe, using argon or mixed shielding gas. If you try to perform a weld without purging, the oxygen present will cause discoloration and imperfections and will greatly impact the integrity of the weld. Purging also helps keep the weld from sinking in during wire-add applications by maintaining pressure on the inside of the pipe.
Use purge plugs, back purge wands, or purge trees to diffuse the chosen inert gas evenly into the tube or pipe. Basic purging can be done with heat resistant tape, but you sacrifice the consistency provided by purge plugs. With your workpiece purged of all traces of oxygen, you are ready to start an arc.
Step 5. Weld
Contact Morgan Industrial Technology to find out if an orbital welding machine is right for your application. MIT represents the best manufacturers in the industry and is your single source for orbital welding equipment, repairs, rental, and training.